The Special Features section of the Palette allows the administrator to add the Submission Tracking field to a tab and to add Custom HTML.
Submission Tracking
Submission Tracking allows you to track the medium by
which issues in a FootPrints workspace are received. When this feature is enabled, it creates a special field
that is used to track how Issues are submitted in FootPrints. This
field cannot be edited by customers; it is a read-only field whose value is
automatically set by the system for Web, Web-Auto Suggest,
and Email.
If custom
values are defined, the agent can select a value when creating an issue (the default value is Phone).
The field can be included in reports, searches, and escalation rules. The feature
allows for the medium to be recorded as follows:
Web—Applies
to issues submitted by customers via the Customer Self-service web interface.
Web - Auto Suggest Applies to issues submitted and closed by customers via the Customer Self-service web interface when both the Auto-Suggest Solutions feature and the Submission Tracking feature are enabled.
Email—Applies to issues sent to FootPrints via email.
Phone—The default for issues created by agents if custom choices are not defined.
Twitter — The agent can select "Twitter" if he created an Issue from a Twitter Tweet.
Custom—In addition to Phone, additional values can be added for the agent to select (e.g., "Walk-up").
Adding the Submission Tracking Field
To add a Submission Tracking field to a tab, drag and drop "Submission Tracking" from the Palette to the location where you want it to appear on the tab.
Setting Properties
When you drag and drop a Submission Tracking field into the Canvas, the Properties window is displayed.
Click a section heading to expand or collapse the section. Enter values into the fields as follows:
BASIC ATTRIBUTES
Name—Enter a name
for the field. This will be displayed as a label for the field on the published form.
Width—Select the number of columns the field spans. The field can span up to six columns, depending on the settings (see Changing the Number of Columns in a Tab in Working with Tabs).
Input Size—Input Size allows you to determine how much of the field's width is occupied by the field input. For example, you might want a field to occupy a row by itself (three columns), but because the value entered into that row will only be a few characters long, you might not want the field input to occupy the entire length of the row. Options for this property are:
Mini—Occupies approximately 20% of the field width.
Very Small—Occupies approximately 45% of the field width.
Small—Occupies approximately 50% of the field width.
Medium—Occupies approximately 80% of the field width.
Long (the default)—Occupies approximately 98% of the field width.
Type—The number beside Submission Tracking states the number of values that have been defined for the field. Click the number to expand the CHOICES section of the Properties window.
CHOICES—Specify the choices available to the user from the field.
Add—The Add link adds values to the field. When you click the Add link, the Add Choices Editor is displayed. Type the values into the field and press Enter after each value. Click the Add Choices button when you have entered all of the values. The Add Choices Editor enforces uniqueness; if you enter the same value twice, when you click the Add Choices button, the values are not added but, instead, an asterisk is displayed next to the repeated value. If the values are accepted, a list of the values are displayed in the section.
Sort—The Sort link sorts the list of value in ascending alphabetical order. Clicking the button again sorts the list in descending alphabetical order.
Reset—The Reset link deletes all values from the field.
Re-use—The Re-use link opens a separate window that displays a list of all existing drop-down and multi-select fields in the system. To preview a field's list of choices, select a field from the drop-down on the left. When you have found the field whose choice list you want to re-use, click the GO button. You are returned to the Properties window and the drop-down field is populated with the Re-use values. If you re-use values, the Web and Email values remain. These values cannot be deleted from the field.
Controls for the list of values—Once values have been added to the field, the values are displayed in a list. The following controls can then be viewed and selected when hovering the mouse over a value in the list:
Trash can icon—Click the icon to delete the field.
Checkmark icon—Sets the value as the default for the field. Click the icon to set the value as the default. To change the default, click the same icon on a different value.
Move icon—Move the value to another position in the list. To move the value, hold down the mouse button on the Move icon and drag the value to the new location.
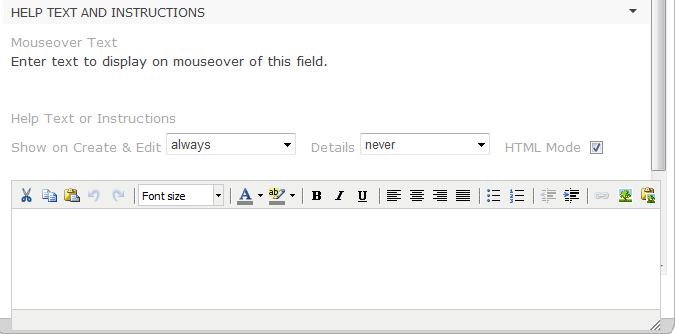
HELP TEXT AND INSTRUCTIONS
Mouseover Text—Enter the text to be displayed when a cursor hovers over the field or the field name. Text is limited to 100 characters.
Help Text and Instructions—Help text and instructions can be as detailed as you like and are displayed above the field on the published form.
Show on Create & Edit—Select whether to show the help text and instructions on the Create and Edit pages of an issue:
Always—The text and instructions are always visible to the agent or customer.
If field is shown—Display the text and instructions only if the field is visible to the agent or customer.
If row is shown—Display the text and instructions only if the row in which the field appears is visible to the agent or customer.
Details—Select whether to show the help text and instructions on the Details page of an issue.
Never—The text and instructions are never visible to the agent or customer.
Always—The text and instructions are always visible to the agent or customer.
If field is shown—Display the text and instructions only if the field is visible to the agent or customer.
Rich Text Mode checkbox—Check the box to use the Rich Text Editor to edit the instructions. The editor provides a variety of text formatting options, including font options and HTML options such as inserting an image from a file or the clipboard, linking to a URL, etc. Leave the box unchecked to use plain text for the help text and instructions. The box is checked by default.
Text Input field—Enter the help text or instructions into the input field.
PERMISSIONS AND ACCESS—Permissions cannot be changed for the Submission Tracking field. The field is optional (can be viewed or edited) for all agent roles and hidden for all customer roles.
CANCEL/SAVE buttons—To cancel the edits you've made to the field, click the Cancel button below the Properties window. To save the edits, click the Save button. If the field is being introduced for the first time and has not been saved before, clicking Cancel leaves the Properties window without adding the field to the form. Clicking Save does not publish the field addition/edit to the production version of the form, that is, the changes to the form do not become visible to the user until the form has been published.
Editing, Moving, or Deleting the Field
To edit the field properties, from the Form Designer, hover over the field and click on the edit icon.
To move the field, from the Form Designer, hover over the field, click on the move icon, hold down the mouse button, and drag the field to the location in which you want it displayed.
To delete the field, from the Form Designer, hover over the field and click on the trash can icon. Deletion is not permitted if a field is part of some other feature (such as a field dependency). In those instances, the relationship between the field and the other feature must first be severed before the field can be deleted.
Note
Deleted data fields are no longer viewable, and FootPrints
forms no longer contain that field. The
column is also deleted from the database and the data is no longer accessible. To
undelete a
field (assuming you've made a backup of your database), contact BMC for instructions.
Changing the Field Name
You can change the field name from the Form Designer without going into the Properties window. To do so, click in the field name from the Form Designer. The name is highlighted. Type the new name into the field.
Custom HTML
The workspace administrator can include instructions or other information in the Create Issue, Edit Issue, Detail, and Submit Request pages. You can optionally insert HTML or text headers above
any field or row of fields, including custom Issue fields, custom Address Book fields, and Attachments.
In
addition, if any of the fields are set to be hidden fields, you can choose
to display the HTML/text header even if the field is hidden, for instances when:
You want field headers
to break up the Issue Information section into different subsections, or
You want field headers
to put additional SAVE buttons throughout a long Issue Information
section.
To Insert Custom HTML:
Drag and drop "Custom HTML" from the Palette to the location where you want it to appear on the tab.
Click a section heading to expand or collapse the section. Enter values into the fields as follows:
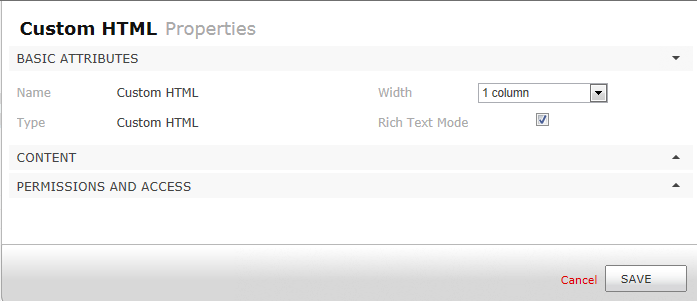
BASIC ATTRIBUTES
Name—Enter a name
for the field. This will be displayed as a label for the field on the published form.
Width—Select the number of columns that the field spans. (The field can span up to six columns, depending on the settings (see Changing the Number of Columns in a Tab in Working with Tabs).
Rich Text Mode checkbox—Check the box to use the Rich Text Editor to edit the instructions. The editor provides a variety of text formatting options, including font options and HTML options such as inserting an image from a file or the clipboard, linking to a URL, etc. Leave the box unchecked to use plain text for the help text and instructions. The box is checked by default.
CONTENT—Enter the HTML or plain text in the field. If Rich Text Mode is selected above, you can use the Rich Text Editor to format the content. The screen shot below shows the Rich Text Editor. With respect to %%Variable%%
expressions, some field data from the Issue can also be used in the custom HTML/text
headers, as follows:
Issue
Number—%%MRID%%
Title—%%TITLE%%
Priority—%%PRIORITY%%
Status—%%STATUS%%
Submitter—%%SUBMITTER%%
Workspace
ID—%%PROJID%%
Workspace
and Address Book fields—%%FIELD
NAME%% where "FIELD NAME" is the name of the field in upper
case.
PERMISSIONS AND ACCESS—The only permission choices available are Hidden or Visible. Click a box in the table to select your choice.
CANCEL/SAVE buttons—To cancel the edits you've made to the field, click the Cancel button below the Properties window. To save the edits, click the Save button. If the field is being introduced for the first time and has not been saved before, clicking Cancel leaves the Properties window without adding the field to the form. Clicking Save does not publish the field addition/edit to the production version of the form, that is, the changes to the form do not become visible to the user until the form has been published.
Editing, Moving, or Deleting the Field
To edit the Custom HTML, from the Form Designer, hover over the Custom HTML and click on the edit icon.
To move the Custom HTML, from the Form Designer, hover over the Custom HTML, click on the move icon, hold down the mouse button, and drag the Custom HTML to the location in which you want it displayed.
To delete the Custom HTML, from the Form Designer, hover over the Custom HTML and click on the trash can icon.
Changing the Custom HTML Name
You can change the Custom HTML name from the Form Designer without going into the Properties window. To do so, click in the Custom HTML name from the Form Designer. The name is highlighted. Type the new name into the field.
Link Custom HTML to a URL
When the following sample Javascripts are entered in the HTML Editor, theCustom HTML becomes a link to the URL and the data in the field is passed to the URL.
The following script works for drop-down fields only. The following sample script uses a field named "Product" for this example. Use your own field name in place of the word "Product", "url =" must point to the URL to which you want to pass the value, and use the "+prod" where you want to place the value of the field into the URL.
<SCRIPT LANGUAGE="JavaScript"> function ProductInfo(){var prod=document.regform.Product.options[document.regform.Product.selectedIndex].value; var url = '/MRcgi/product.pl?PROD='+prod; var ProductInfo=window.open(url);}</SCRIPT><a href=javascript:ProductInfo();>Click for Product info</a>
The following field works for single-line character fields only. The example field name is "Company Documentation", and the value of variable "CompanyVal" is what is passed from the text field. Again, "url =" must point to the URL to which you want to pass the value.
<SCRIPT LANGUAGE="JavaScript"> function CompanyInfo(){ var CompanyVal =document.regform.Company__bDocumentation.value; var url = '/tmp/Attachments/Workspace7/' + CompanyVal; var CompanyInfo=window.open(url);}</SCRIPT><a href=javascript:CompanyInfo();>Click for Document</a>