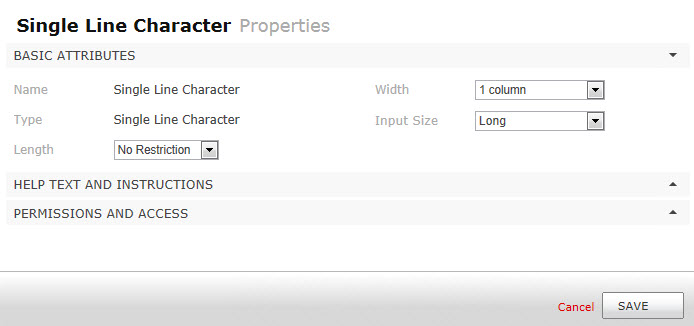
When you drag and drop a Single-line Character field onto the Canvas, the Properties window is displayed.
Click a section heading to expand or collapse the section. Enter values into the fields as follows:
BASIC ATTRIBUTES
Name—Enter a name
for the field. This will be displayed as a label for the field on the published form.
Width—Select the number of columns the field spans. The field can span up to six columns, depending on the settings (see Changing the Number of Columns in a Tab in Working with Tabs).
Input Size—Input Size allows you to determine how much of the field's width is occupied by the field input. For example, you might want a field to occupy a row by itself (three columns), but because the value entered into that row will only be a few characters long, you might not want the field input to occupy the entire length of the row. Options for this property are:
Mini—Occupies approximately 20% of the field width.
Very Small—Occupies approximately 45% of the field width.
Small—Occupies approximately 50% of the field width.
Medium—Occupies approximately 80% of the field width.
Long (the default)—Occupies approximately 98% of the field width.
Length—This
option applies to single-line character, integer, and real number fields
only. For these fields, the administrator has the option of defining a
field length. If
defined, users must enter data of the specified number of characters or digits when
creating or editing an issue or request. Choices
for defining field length are:
No Restriction—No field length
restriction (the default).
Exactly—Enter a number
in the box for the exact number of characters users must enter in
the field.
At
least—Enter
a number in the box for the minimum number of characters field data
must contain.
At
most—Enter
a number in the box for the maximum number of characters field data
can contain.
Between—Enter two numbers
defining a range of the number of characters accepted for field data.
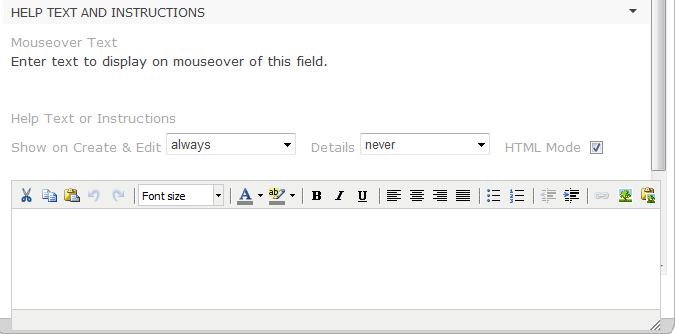
HELP TEXT AND INSTRUCTIONS
Mouseover Text—Enter the text to be displayed when a cursor hovers over the field or the field name. Text is limited to 100 characters.
Help Text and Instructions—Help text and instructions can be as detailed as you like and are displayed above the field on the published form.
Show on Create & Edit—Select whether to show the help text and instructions on the Create and Edit pages of an issue:
Always—The text and instructions are always visible to the agent or customer.
If field is shown—Display the text and instructions only if the field is visible to the agent or customer.
If row is shown—Display the text and instructions only if the row in which the field appears is visible to the agent or customer.
Details—Select whether to show the help text and instructions on the Details page of an issue.
Never—The text and instructions are never visible to the agent or customer.
Always—The text and instructions are always visible to the agent or customer.
If field is shown—Display the text and instructions only if the field is visible to the agent or customer.
Rich Text Mode checkbox—Check the box to use the Rich Text Editor to edit the instructions. The editor provides a variety of text formatting options, including font options and HTML options such as inserting an image from a file or the clipboard, linking to a URL, etc. Leave the box unchecked to use plain text for the help text and instructions. The box is checked by default.
Text Input field—Enter the help text or instructions into the input field.
PERMISSIONS AND ACCESS—View or set the default permissions for a custom field.
For each field, you can set up separate sets of permissions for agents and customers for this workspace. These are called "Agent Default" and "Customer Default" settings.
Example
You might want to require agents to enter information in an issue information field when the issue's status is open, and restrict them from entering information in the field when the issue is closed.
So when setting up the Issue Information field, you would set the Agent Default permissions to "Required" for the status "Open", "Read Only" for the status "Closed", and "Optional" for all other statuses.
NOTE
Workspace Administrators can customize permissions per user role, which override the Agent Default and Customer Default permissions set up here. If permissions for a user role have been set up, a message will display above the default permissions listing the user role along with an option to remove custom permissions from the role. If you remove the custom permissions, the field will return to using the Agent Default or Customer Default permissions. (See below for steps.) For more information on field permissions per user role (set up in Administration | Workspace | User Roles) see Field Permissions.
To Set Permissions for a Field:
Click a cell in the table corresponding to one of the permissions listed below, such as "Optional". This will apply the permission to all statuses at once (Open, Resolved, Closed, etc). The selected cell is color-coded green (see the Agent Default example in the screen shot, below).
Hidden—Users cannot view the field
Read Only—Users can view but not edit the field
Optional—Users can view and edit the field, but are not required to populate the field
Required— Users can view and edit the field, and are required to populate the field Note: "Required" is not available for the Checkbox field type.
To set separate permissions per status (advanced permissions):
Click Toggle advanced below Agent Default or Customer Default to view all of the statuses.
Then click the cell corresponding to the permission and status (see the Customer Default example in the screen shot, below).
Tip: Click a column heading to apply the permission to all statuses for that column at once.
To reset advanced permissions to the initial (basic) settings, click Toggle advanced . This will reset the permissions to Optional for Agent Default or Hidden for Customer Default.
To Remove Custom Permission from a User Role:
NOTE
The following applies only when a message displays above the Agent Default or Customer Default permissions indicating that a role has custom permissions.
Mouse over the role (listed above the Agent Default or Customer Default permissions), then click the Remove button.
The custom permissions are removed from the role and the name of the role displays with a strikethrough (e.g., Role Name). Once you save your changes, the role name will no longer display on the window.
If you decide not to remove the role and have not yet saved your changes, you can mouse over the role and click the Undo button.
CANCEL/SAVE buttons—To cancel the edits you've made to the field, click the Cancel button below the Properties window. If the field is being introduced for the first time and has not been saved before, clicking Cancel leaves the Properties window without adding the field to the form. To save the edits, click the Save button. Clicking Save does not publish the field addition/edit to the production version of the form, that is, the changes to the form do not become visible to the user until the form has been published.
Defining Permissions Per Role
To define field permissions with greater granularity, you can customize them for a specific role by editing the Role Properties. Once you have done so, if you return to the Form Designer, the customized roles are listed as exceptions to the default permissions.
Editing, Moving, or Deleting the Field
To edit the field properties, from the Form Designer, hover over the field and click on the edit icon.
To move the field, from the Form Designer, hover over the field, click on the move icon, hold down the mouse button, and drag the field to the location in which you want it displayed.
To delete the field, from the Form Designer, hover over the field and click on the trash can icon. Deletion is not permitted if a field is part of some other feature (such as a field dependency). In those instances, the relationship between the field and the other feature must first be severed before the field can be deleted.
Note
Deleted data fields are no longer viewable, and FootPrints
forms no longer contain that field. The
column is also deleted from the database and the data is no longer accessible. To
undelete a
field (assuming you've made a backup of your database), contact BMC for instructions.
Changing the Field Name
You can change the field name from the Form Designer without going into the Properties window. To do so, click in the field name from the Form Designer. The name is highlighted. Type the new name into the field.