Configuration of Contact Issue History in Salesforce.com
This section describes how to set up access so that a
salesperson in Salesforce.com can view FootPrints
Issues for a specified contact.
There are two types of links
that can be created from Salesforce.com to FootPrints:
Contact
history—Displays all of the support issues for the individual
user.
Company
history—Displays all of the support issues for the user's organization.
An example of a contact history
link is given on the Sales/CRM Integration Administration screen.
Configure the FootPrints Side
To configure the FootPrints side:
Within
FootPrints,
go to Workspace
Administration | Workspace Options | Add-on Modules | Sales/CRM Integration.
There
is an option to enable Sales/CRM Integration for that Workspace only.
Click Enabled.
For security reasons, there is an option to add a unique
key for each Workspace. This key value must be present in any
links created in order for this feature to work. The field can be
left blank, but this leaves open the possibility of anyone being able
to view the data.
Access and licenses for Salesforce.com is obtained from Salesforce.com
and not from BMC.
Select the Customer
Login link and log in to the customer area with your username (an
email address) and password. Your
customer page is displayed.
Perform steps 3 through 16 of this procedure
twice: once
to set up the Contact History Web Link and once to set up the Company
History Web Link.
Click the Setup
link located in the top right corner of the web page. The
setup page is displayed.
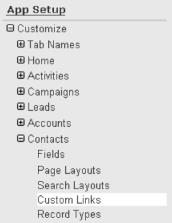
In the left frame,
under the App
Setup heading, select Customize
| Contacts | Custom Links. The
Web
Links: Contact page is displayed.
In the main frame,
click on New.
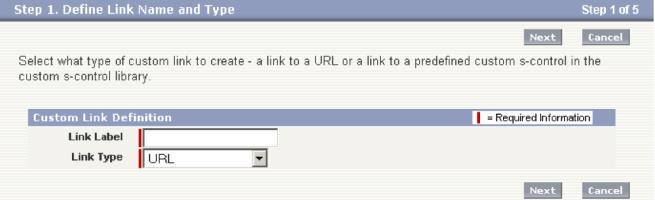
Step
1 is displayed.
In the Link
Label field, enter a name for the link. This
label identifies the link to users. For
example, you might name the link Contact
Support History for the Contact History Web Link or Company
Support History for the Company History Web Link.
Don't change any other fields. After
entering the label, click Next.
Step 2
is displayed.
Step 2 provides drop-down
lists that generate keywords for representing Salesforce.com data in a
URL. You
will use that data when entering the FootPrints
URL later in this procedure. The
URL, in turn, is what Salesforce.com uses to access FootPrints
when you view FootPrints Issues
from within Salesforce.com.
In the Select
Field Type drop-down, select Contact
Fields to set up the Contact History Web Link or Company
Fields to set up the Company History Web Link.
In the Select
Field drop-down, select a field that uniquely identifies this contact.
When you
display FootPrints issues later,
it searches the database
and displays all active issues with matching data in the selected field
for the contact. It
is recommended that you select Contact:
Email, since an email address is generally unique to a contact.
When you select a field, the Copy
Merge Field Value field is populated with a keyword. You
will copy that keyword into the URL in the next step.
In the Link
URL field, enter the FootPrints
URL that Salesforce.com will use to obtain the Issue information. An
example URL is as follows:
You can cut and paste the sample URL provided
on the Sales/CRM setup page in FootPrints
and replace the sample values as follows:
machine.domain.com
(the name of the machine and the domain where FootPrints is installed)
EXT_LINK=1
(Required constant)
PROJECTID=<<Workspace #>> (Required constant
– should be the number of the workspace you are linking to in FootPrints.
You can
obtain this value from the System Administrator if you don't know it.)
One of the next two fields must also be used.
ABN
is used to create a Contact History link, while GRPDETAIL
is used to create a Company History Link.
ABN=<<Copy_Merge_Field_Value>> (The
value Salesforce.com generated in the Copy
Merge Field Value field)
GRPDETAIL=<<company>>
(Optional variable for company data being passed in -- should correspond
to Organizational Unit in FootPrints
Address Book. This type of link will not work unless an Organizational
Unit is defined in the Address Book.) -- This is only used for the
company history lookup.
Once all the parameters
have been entered, click Next.
Step 3 is displayed. Steps
3 and 4 are concerned with the appearance of the Salesforce.com interface.
BMC makes no recommendations as to how you format your display.
Step 5 is a confirmation
window for the settings you chose. Check
the settings and, if you are satisfied, select Save.
A warning
window is displayed telling you that the setup is not completed until
you add it to the Page Layout tab. Click
OK
on the warning window. The
Web
Links: Contact
window is displayed, showing the link you created.
Click the Customize
| Contacts | Page Layouts link in the left frame. The
integration does not work until you have added it to the Page Layouts.
In the Contact
Layout page in the main frame, click the Edit
link next to the web link that you just created (Contact or Company).
On the right side
of the main frame, there is a section labeled View.
If the
name of the Web Link that you just created is not displayed, select Contact
Web Links from the drop-down list in the View
section.
Drag and drop the
name of the Web Link you just created from the View
section to the Web
Links section of the page.
Scroll to the top
of the page and click Save.
A link is displayed on the Contact
page in Salesforce.com. Clicking that link opens that contact's/company’s
history in FootPrints. Remember,
if you want to set up links for both Contact Support History and Company
Support History, you have to go through the procedure twice.
Changing the Link Label
To change the label on the button that links your Salesforce.com
account with the FootPrints database: